REAL PROJECT · WARRINGTON
Wet Room Floor Failure & Rebuild in Warrington
Cracking grout and movement were the warning signs. Opening the floor showed why simply re-grouting it would never have been a sensible answer.
Why I was called in
I was originally asked to look at this wet room because grout was cracking and noticeable movement had developed across the tiled floor.
Cracked grout can be a symptom rather than the problem itself. Instead of treating the surface, I wanted to establish what was happening underneath it.
The first tiles came up — and exposed the fixing method
Tiles were removed from the shower area and across the wet-room former. Large isolated pads of adhesive were visible beneath them, leaving substantial unsupported voids rather than a continuous supporting adhesive bed.
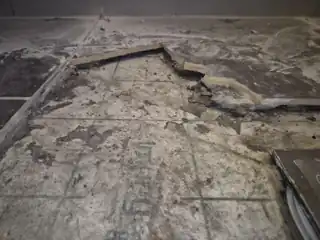
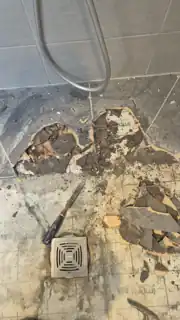
I am not claiming one detail alone caused every symptom. What was clear was that the grout had cracked, the floor could be felt moving, and the investigation had exposed significant voids beneath the tiles. That justified opening the installation further rather than hiding the warning signs with fresh grout.
Opening the wet room properly
The tiled floor was removed and the bottom course of wall tiles was taken out so the substrate, former, waterproofing and critical floor-to-wall junctions could be inspected.
What the strip-out revealed
The existing Impey WaterGuard could now be seen properly. It extended only around 100mm beyond the shower area rather than continuing across the complete bathroom floor. The bonded membrane was removed so the replacement waterproofing could start from a clean, known substrate.
Local areas beside the former were opened for inspection. A section of plywood was replaced where required, and the remaining timber floor was strengthened with additional mechanical fixings at approximately 150mm centres to reduce movement before anything was covered again.
Wall repairs before waterproofing
Two small plasterboard areas loosened while the lower wall course was being removed. They were taken out and replaced with XPS foam tile backer board, giving a rigid, moisture-resistant background in the wet area.
Rebuilding the waterproofing as one system
With the lower wall course removed, the floor-to-wall junctions could be prepared and detailed properly. New Impey WaterGuard was then installed across the full bathroom floor and integrated with the wet-room former, drain area and perimeter junctions.
That continuity matters. Once the tiles are installed, the customer sees porcelain, grout and silicone; the waterproofing doing the real work is hidden permanently underneath.
Checking it before covering it
Before tiling, a practical water check was carried out around the drain while the room below was inspected for visible signs of water ingress. None were observed. This was an additional practical check, not presented as a formal flood test.
Setting out and supporting the replacement floor
The new floor was set out around the room, former and drain. The shower-screen position was also considered so the glass could align neatly over a grout joint, creating a cleaner finished silicone junction.
The replacement porcelain was installed with continuous adhesive coverage rather than isolated pads. Around the drain, envelope cuts allowed the larger tiles to follow the required falls while keeping the layout controlled.
The finished wet room
The lower wall course and perimeter skirting tiles were reinstated, the installation was grouted and the required perimeter/change-of-plane joints were finished with sanitary silicone. The shower screen was then refitted.
What this rebuild involved
- Investigation of cracked grout and floor movement
- Removal of tiles over the wet-room former
- Identification of isolated adhesive pads and unsupported voids
- Full floor strip-out and removal of the lower wall course
- Inspection and local repair of the timber substrate
- Additional mechanical strengthening of the floor
- XPS backer-board repairs to compromised wall areas
- Preparation of floor-to-wall junctions
- Full-floor Impey WaterGuard waterproofing
- Setting out, full-bed porcelain fixing and envelope cuts
- Grouting, sanitary silicone and shower-screen reinstatement
The lesson from this floor
Cracked grout can be a warning, not the actual problem.
If a tiled floor can physically be felt moving, repeatedly replacing the grout does not explain why. Sometimes the responsible option is to investigate, expose the construction and make decisions based on what is actually there.
The finished floor is what everyone sees. The investigation photographs of what was underneath it are the reason this project is worth documenting.
Wet-room advice and installation
This case study sits within my wet room specialist guide. For more detail on the principles behind the work, read why wet rooms fail and why tiles and grout alone do not make a wet area waterproof.
If you are planning a new installation in Warrington, see how I approach wet-room preparation, waterproofing, falls and tiling.
Wet Room Installation Warrington →Problems with an existing wet room?
If you have cracking grout, loose tiles, movement, leaking or concerns about an existing wet room, remedial work cannot realistically be priced by a standard online estimator. The visible problem may only be the symptom.
For remedial wet-room work, I need to inspect the existing installation before recommending a repair or rebuild.
Discuss your wet room problemWarrington & surrounding areas · Site inspection required for remedial wet-room work